名前付きIPアクセスリストを設定する (SSH/Telnet)
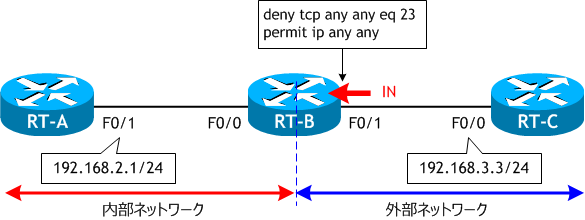
ネットワーク構成図

- RT-A、RT-B、RT-C をネットワーク構成図に示す通り設定し、End-to-End の通信が行えるようにスタティックルートを設定しなさい。
- 以下の情報を基に RT-A で SSH サーバーと Telnet サーバーを構成をしなさい。
- 以下の情報を基に RT-C で SSH サーバーと Telnet サーバーを構成をしなさい。
- RT-A から RT-C へ SSH 接続、Telnet 接続ができることを確認しなさい。
- RT-C から RT-A へ SSH 接続、Telnet 接続ができることを確認しなさい。
- RT-B で、外部ネットワークから内部ネットワークへの telnet のみ禁止する名前付きIPアクセスリストを設定しなさい。
名前は outside とする。 - RT-C から RT-A へ Telnet 接続しなさい。
- RT-C から RT-A へ SSH 接続しなさい。
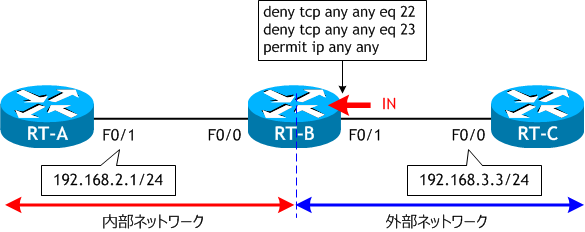
- telnet 拒否条件文の上に、SSH を拒否する条件文を追加しなさい。
- RT-B で、sh run コマンドを実行し、設定したアクセスリストを確認しなさい。
- RT-C から RT-A へ SSH 接続しなさい。
< RT-A >
Router# conf t
Enter configuration commands, one per line.  End with CNTL/Z.
Router(config)# host RT-A
RT-A(config)# int f0/1
RT-A(config-if)# ip add 192.168.2.1 255.255.255.0
RT-A(config-if)# no shut
RT-A(config-if)# ip route 192.168.3.0 255.255.255.0 192.168.2.2
RT-A(config)# ^Z
RT-A#
< RT-B >
Router# conf t
Enter configuration commands, one per line.  End with CNTL/Z.
Router(config)# host RT-B
RT-B(config)# int f0/0
RT-B(config-if)# ip add 192.168.2.2 255.255.255.0
RT-B(config-if)# no shut
RT-B(config-if)# int f0/1
RT-B(config-if)# ip add 192.168.3.2 255.255.255.0
RT-B(config-if)# no shut
RT-B(config-if)# ^Z
RT-B#
< RT-C >
Router# conf t
Enter configuration commands, one per line.  End with CNTL/Z.
Router(config)# host RT-C
RT-C(config)# int f0/0
RT-C(config-if)# ip add 192.168.3.3 255.255.255.0
RT-C(config-if)# no shut
RT-C(config-if)# ip route 192.168.2.0 255.255.255.0 192.168.3.2
RT-C(config)# ^Z
RT-C#
| ドメイン名 | jukenki.local |
|---|---|
| SSH で使用するユーザ名 | ccna |
| SSH で使用するパスワード | cisco |
| SSH 暗号化鍵の長さ | 1024 |
| line vty | SSH と Telnet のみ許可 |
< RT-A >
RT-A# conf t
Enter configuration commands, one per line.  End with CNTL/Z.
RT-A(config)# ip domain-name jukenki.local      ← ドメイン名の設定
RT-A(config)# crypto key generate rsa           ← SSH で使用する RSA 鍵の生成
The name for the keys will be: RT-A.jukenki.local
Choose the size of the key modulus in the range of 360 to 4096 for your
  General Purpose Keys. Choosing a key modulus greater than 512 may take
  a few minutes.

How many bits in the modulus [512]: 1024         ← 鍵の長さを指定 (1024以上を推奨)
% Generating 1024 bit RSA keys, keys will be non-exportable...
[OK] (elapsed time was 6 seconds)

RT-A(config)# username ccna password cisco       ← SSH で使用するユーザ名とパスワードの設定
RT-A(config)# line vty 0 4
RT-A(config-line)# login local                   ← ローカルで作成したアカウントでログイン認証を行う
RT-A(config-line)# transport input ssh telnet    ← SSH と telnet のみ許可するように設定
RT-A(config-line)# ^Z
RT-A#
| ドメイン名 | jukenki.local |
|---|---|
| SSH で使用するユーザ名 | ccna |
| SSH で使用するパスワード | cisco |
| SSH 暗号化鍵の長さ | 1024 |
| line vty | SSH と Telnet のみ許可 |
< RT-C >
RT-C# conf t
Enter configuration commands, one per line.  End with CNTL/Z.
RT-C(config)# ip domain-name jukenki.local      ← ドメイン名の設定
RT-C(config)# crypto key generate rsa           ← SSH で使用する RSA 鍵の生成
The name for the keys will be: RT-C.jukenki.local
Choose the size of the key modulus in the range of 360 to 4096 for your
  General Purpose Keys. Choosing a key modulus greater than 512 may take
  a few minutes.

How many bits in the modulus [512]: 1024         ← 鍵の長さを指定 (1024以上を推奨)
% Generating 1024 bit RSA keys, keys will be non-exportable...
[OK] (elapsed time was 6 seconds)

RT-C(config)# username ccna password cisco       ← SSH で使用するユーザ名とパスワードの設定
RT-C(config)# line vty 0 4
RT-C(config-line)# login local                   ← ローカルで作成したアカウントでログイン認証を行う
RT-C(config-line)# transport input ssh telnet    ← SSH と telnet のみ許可するように設定
RT-C(config-line)# ^Z
RT-C#
< RT-A >
RT-A# ssh -l ccna 192.168.3.3
Password: cisco   ← 実際には表示はされない
RT-C> exit

[Connection to 192.168.3.3 closed by foreign host]
RT-A# telnet 192.168.3.3
Trying 192.168.3.3 ... Open

User Access Verification

Username: ccna
Password: cisco   ← 実際には表示はされない
RT-C> exit

[Connection to 192.168.3.3 closed by foreign host]
RT-A#
プロンプトが RT-A から RT-C に変わっていますので、SSH も telnet も成功しています。
< RT-C >
RT-C# ssh -l ccna 192.168.2.1
Password: cisco   ← 実際には表示はされない
RT-A> exit

[Connection to 192.168.2.1 closed by foreign host]
RT-C# telnet 192.168.2.1
Trying 192.168.2.1 ... Open

User Access Verification

Username: ccna
Password: cisco   ← 実際には表示はされない
RT-A> exit

[Connection to 192.168.2.1 closed by foreign host]
RT-C#
プロンプトが RT-C から RT-A に変わっていますので、SSH も telnet も成功しています。
< RT-B >
RT-B# conf t
Enter configuration commands, one per line.  End with CNTL/Z.
RT-B(config)# ip access-list extended outside
RT-B(config-ext-nacl)# deny tcp any any eq 23
RT-B(config-ext-nacl)# permit ip any any
RT-B(config-ext-nacl)# do sh access-lists
Extended IP access list outside
    10 deny tcp any any eq telnet
    20 permit ip any any
RT-B(config-ext-nacl)# int f0/1
RT-B(config-if)# ip access-group outside in
RT-B(config-if)#
名前付きIPアクセスリストは、番号付きIPアクセスリストの新しい設定方法と同じで、番号のところが「英数字」の名前に変わるだけです。
「23」は telnet のポート番号で、「23」の代わりに telnet と入力することも可能です。今回のネットワークは、外部と内部しかないので、送信元と宛先を両方とも any にしましたが、他にもネットワークがある場合は個別のネットワークで指定します。

※ 名前付きIPアクセスリストと番号付きIPアクセスリストは、名前を使うか番号を使うかの違いだけですので、このシナリオは番号付きIPアクセスリストでも可能です。名前を使った方が識別しやすいので、最近は名前付きIPアクセスリストが多く使われます。
「23」は telnet のポート番号で、「23」の代わりに telnet と入力することも可能です。今回のネットワークは、外部と内部しかないので、送信元と宛先を両方とも any にしましたが、他にもネットワークがある場合は個別のネットワークで指定します。

※ 名前付きIPアクセスリストと番号付きIPアクセスリストは、名前を使うか番号を使うかの違いだけですので、このシナリオは番号付きIPアクセスリストでも可能です。名前を使った方が識別しやすいので、最近は名前付きIPアクセスリストが多く使われます。
< RT-C >
RT-C# telnet 192.168.2.1
Trying 192.168.2.1 ...
% Destination unreachable; gateway or host down

RT-C#
telnet に失敗しました。
< RT-C >
RT-C# ssh -l ccna 192.168.2.1
Password: cisco   ← 実際には表示はされない
RT-A> exit

[Connection to 192.168.2.1 closed by foreign host]
RT-C#
アクセスリストで拒否したのは telnet だけなので、SSH の接続は成功します。
< RT-B >
RT-B(config-if)# ip access-list extended outside
RT-B(config-ext-nacl)# 9 deny tcp any any eq 22
RT-B(config-ext-nacl)# do sh access-lists
Extended IP access list outside
    9 deny tcp any any eq 22
    10 deny tcp any any eq telnet (1 match)
    20 permit ip any any
RT-B(config-ext-nacl)# ^Z
RT-B#
< RT-B >
RT-B# sh run | section access-list
ip access-list extended outside
 deny   tcp any any eq 22
 deny   tcp any any eq telnet
 permit ip any any
RT-B#
番号付きIPアクセスリストの sh run の実行結果を覚えているでしょうか。
旧来の方法で設定しても、新しい方法で設定しても、sh run の結果は旧来のコマンド形態での表示になっていました。しかし、名前付きIPアクセスリストでは、新しいコマンド形態での表示になっています。
旧来の方法で設定しても、新しい方法で設定しても、sh run の結果は旧来のコマンド形態での表示になっていました。しかし、名前付きIPアクセスリストでは、新しいコマンド形態での表示になっています。
< RT-C >
RT-C# ssh -l ccna 192.168.2.1
% Destination unreachable; gateway or host down

RT-C#
SSH 接続に失敗しました。
※ 次の「シナリオ」に続きます。
