複数のルータでSSHを使用する (outgoing SSHセッションの確認と切断)
※ 前の「シナリオ」の続きとして記載しています。
ネットワーク構成図

- 以下の情報を基に、RT-A と RT-C で SSH サーバーを構成をしなさい。
- RT-B から RT-A に SSH し、次に、接続を維持したまま RT-B に戻りなさい。
- RT-B から RT-C に SSH し、次に、接続を維持したまま RT-B に戻りなさい。
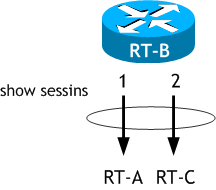
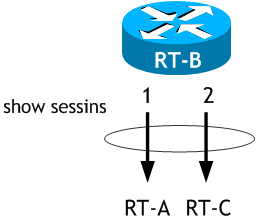
- RT-Bで、show sessions コマンドを実行しなさい。
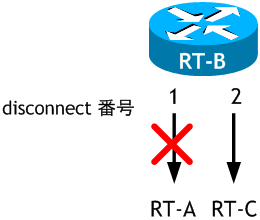
- RTB で、RT-A と RT-C へ SSH しているセッションを切断しなさい。
- RT-B が他のルータに SSH しているセッションを表示しなさい。
| ドメイン名 | jukenki.local |
|---|---|
| SSH で使用するユーザ名 | ccna |
| SSH で使用するパスワード | cisco |
| SSH 暗号化鍵の長さ | 1024 |
| line vty | SSH のみ許可 |
< RT-A >
RT-A# conf t
Enter configuration commands, one per line.  End with CNTL/Z.
RT-A(config)# ip domain-name jukenki.local      ← ドメイン名の設定
RT-A(config)# crypto key generate rsa           ← SSH で使用する RSA 鍵の生成
The name for the keys will be: RT-A.jukenki.local
Choose the size of the key modulus in the range of 360 to 4096 for your
  General Purpose Keys. Choosing a key modulus greater than 512 may take
  a few minutes.

How many bits in the modulus [512]: 1024        ← 鍵の長さを指定 (1024以上を推奨)
% Generating 1024 bit RSA keys, keys will be non-exportable...
[OK] (elapsed time was 2 seconds)

RT-A(config)# username ccna password cisco      ← SSH で使用するユーザ名とパスワードの設定
RT-A(config)# line vty 0 4
RT-A(config-line)# login local                  ← ローカルで作成したアカウントでログイン認証を行う
RT-A(config-line)# transport input ssh          ← SSH のみ許可するように設定
RT-A(config-line)# ^Z
RT-A#
< RT-C >
RT-C# conf t
Enter configuration commands, one per line.  End with CNTL/Z.
RT-C(config)# ip domain-name jukenki.local      ← ドメイン名の設定
RT-C(config)# crypto key generate rsa           ← SSH で使用する RSA 鍵の生成
The name for the keys will be: RT-C.jukenki.local
Choose the size of the key modulus in the range of 360 to 4096 for your
  General Purpose Keys. Choosing a key modulus greater than 512 may take
  a few minutes.

How many bits in the modulus [512]: 1024        ← 鍵の長さを指定 (1024以上を推奨)
% Generating 1024 bit RSA keys, keys will be non-exportable...
[OK] (elapsed time was 4 seconds)

RT-C(config)# username ccna password cisco      ← SSH で使用するユーザ名とパスワードの設定
RT-C(config)# line vty 0 4
RT-C(config-line)# login local                  ← ローカルで作成したアカウントでログイン認証を行う
RT-C(config-line)# transport input ssh          ← SSH のみ許可するように設定
RT-C(config-line)# ^Z
RT-C#
RT-B から RT-A に SSH し、この SSH を中断して RT-B に戻り、次に、RT-B から RT-C にSSHし、この SSH も中断して再度 RT-B に戻り、RT-B でこれらの SSH セッションの確認と切断を行います。

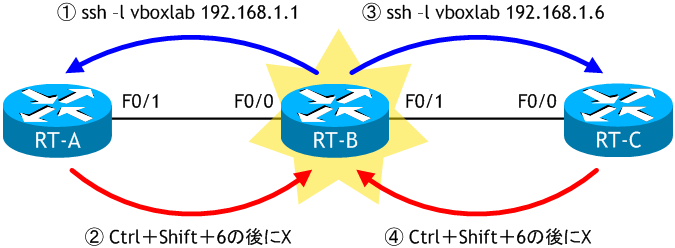
< RT-B >
RT-B# ssh -l ccna 192.168.1.1

Password: cisco   ← 実際には表示はされない
RT-A>   ← ここで Ctrl+Shift+6 キーを押し、その後、X キーを押す
RT-B#   ← プロンプトが RT-A から RT-B に変わったので、RT-B に戻っている
< RT-B >
RT-B# ssh -l ccna 192.168.1.1

Password:
RT-A>
RT-B# ssh -l ccna 192.168.1.6

Password: cisco   ← 実際には表示はされない
RT-C>   ← ここで Ctrl+Shift+6 キーを押し、その後、X キーを押す
RT-B#   ← プロンプトが RT-C から RT-B に変わったので、RT-B に戻っている
< RT-B >
RT-B# sh sessions
Conn Host                Address             Byte  Idle Conn Name
   1 192.168.1.1         192.168.1.1            0     0 192.168.1.1
*  2 192.168.1.6         192.168.1.6            0     0 192.168.1.6

RT-B#
show sessions コマンドで、自ルータが他ルータに SSH しているセッションを表示することができます。
表示されているIPアドレス判断できますが、1番は RT-A への SSH で、2番は RT-C への SSH です。
表示されているIPアドレス判断できますが、1番は RT-A への SSH で、2番は RT-C への SSH です。
< RT-B での操作 >
RT-B# disconnect 1    ← RT-A へのセッションを切断
Closing connection to 192.168.1.1 [confirm] < Enter >
RT-B# disconnect 2    ← RT-C へのセッションを切断
Closing connection to 192.168.1.6 [confirm] < Enter >
RT-B#
自分自身が SSH 接続をしているセッションを切断する場合は、disconnect <セッション番号> コマンドを使用します。セッション番号は、show sessions で左側に表示された番号です。

< RT-B での操作 >
RT-B# sh sessions
% No connections open    ← RT-B が SSH しているセッションはない
RT-B#
※ 次の「シナリオ」に続きます。