OSPFでのDR/BDRの選出を確認する (プライオリティを変更する)
※ 前の「シナリオ」の続きとして記載しています。
- RT-C で、sh ip ospf int f0/0 コマンドを使い、OSPF プライオリティを確認しなさい。
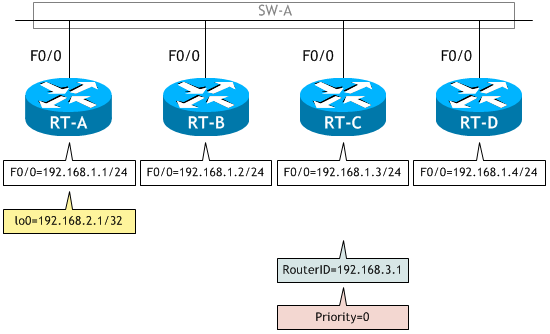
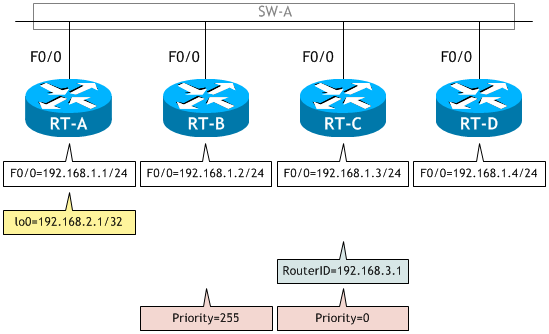
- RT-C の OSPF プライオリティを 0 に設定しなさい。
- RT-C で、sh ip ospf int f0/0 コマンドを使い、State と Priority を確認しなさい。
- RT-C で、sh ip ospf neighbor コマンドを実行しなさい。
- RT-B の OSPF プライオリティを 255 に設定しなさい。
- RT-B で、sh ip ospf int f0/0 コマンドを使い、State と Priority を確認しなさい。
- RT-B で、sh ip ospf neighbor コマンドを実行しなさい。
- SW-A の電源を [OFF] → [ON] しなさい。
- SW-A が完全に起動した後、RT-B で sh ip ospf int f0/0 コマンドを使い、State と Priority を確認しなさい。
- RT-B で、sh ip ospf neighbor コマンドを実行しなさい。
< RT-C >
RT-C# sh ip ospf int f0/0 | include Priority
  Transmit Delay is 1 sec, State DR, Priority 1
RT-C#
OSPF プライオリティはデフォルトの 1 です。

< RT-C >
RT-C# conf t
Enter configuration commands, one per line.  End with CNTL/Z.
RT-C(config)# int f0/0
RT-C(config-if)# ip ospf priority 0
RT-C(config-if)# ^Z
RT-C#
< RT-C >
RT-C# sh ip ospf int f0/0 | include Priority
  Transmit Delay is 1 sec, State DROTHER, Priority 0       ← RT-C は DROTHER でプライオリティは 0
RT-C#
OSPF プライオリティを 0 に設定すると、プライオリティの設定はすぐに反映し、DR から DROTHER になりました。
OSPF プライオリティ=0 に設定したルータは、DR にも BDR にもなりません。
OSPF プライオリティ=0 に設定したルータは、DR にも BDR にもなりません。
< RT-C >
RT-C# sh ip ospf neighbor

Neighbor ID     Pri   State           Dead Time   Address         Interface
192.168.1.2       1   2WAY/DROTHER    00:00:34    192.168.1.2     FastEthernet0/0   ← RT-B
192.168.1.4       1   FULL/BDR        00:00:36    192.168.1.4     FastEthernet0/0   ← RT-D
192.168.2.1       1   FULL/DR         00:00:34    192.168.1.1     FastEthernet0/0   ← RT-A
RT-C#
RT-C が DR から DROTHER になったことにより、RT-A が DR に、RT-D が BDR になりました。
| ルータ名 | プライオリティ | ルータ ID | 機能 |
|---|---|---|---|
| RT-A | 1 | 192.168.2.1 | BDR → DR |
| RT-B | 1 | 192.168.1.2 | DROTHER |
| RT-C | 0 | 192.168.3.1 | DR → DROTHER |
| RT-D | 1 | 192.168.1.4 | DROTHER → BDR |
< RT-B >
RT-B# conf t
Enter configuration commands, one per line.  End with CNTL/Z.
RT-B(config)# int f0/0
RT-B(config-if)# ip ospf priority 255
RT-B(config-if)# ^Z
RT-B#
< RT-B >
RT-B# sh ip ospf int f0/0 | include Priority
  Transmit Delay is 1 sec, State DROTHER, Priority 255   ← プライオリティは 255 だが DROTHER のまま
RT-B#
OSPF プライオリティを 255 に設定すると、プライオリティの設定はすぐに反映されますが、DROTHER のままです。
< RT-B >
RT-B# sh ip ospf neighbor

Neighbor ID     Pri   State           Dead Time   Address         Interface
192.168.1.4       1   FULL/BDR        00:00:35    192.168.1.4     FastEthernet0/0   ← RT-D
192.168.2.1       1   FULL/DR         00:00:33    192.168.1.1     FastEthernet0/0   ← RT-A
192.168.3.1       0   2WAY/DROTHER    00:00:35    192.168.1.3     FastEthernet0/0   ← RT-C
RT-B#
DR/BDR に変更はありません。
| ルータ名 | プライオリティ | ルータ ID | 機能 |
|---|---|---|---|
| RT-A | 1 | 192.168.2.1 | DR |
| RT-B | 255 | 192.168.1.2 | DROTHER |
| RT-C | 0 | 192.168.3.1 | DROTHER |
| RT-D | 1 | 192.168.1.4 | BDR |
< RT-B >
RT-B# sh ip ospf int f0/0 | include Priority
  Transmit Delay is 1 sec, State DR, Priority 255   ← プライオリティは 255 で DR
RT-B#
最も大きなプライオリティ (255) の RT-B が DR になりました。
ルータ ID の値に関係なく、最も大きなプライオリティを持つルータが DR になります。
ルータ ID の値に関係なく、最も大きなプライオリティを持つルータが DR になります。
< RT-B >
RT-B# sh ip ospf neighbor

Neighbor ID     Pri   State           Dead Time   Address         Interface
192.168.1.4       1   FULL/DROTHER    00:00:37    192.168.1.4     FastEthernet0/0   ← RT-D
192.168.2.1       1   FULL/BDR        00:00:37    192.168.1.1     FastEthernet0/0   ← RT-A
192.168.3.1       0   FULL/DROTHER    00:00:38    192.168.1.3     FastEthernet0/0   ← RT-C
RT-B#
RT-B が DR になったことにより、RT-A が BDR に、RT-D が DROTHER になりました。
| ルータ名 | プライオリティ | ルータ ID | 機能 |
|---|---|---|---|
| RT-A | 1 | 192.168.2.1 | DR → BDR |
| RT-B | 255 | 192.168.1.2 | DROTHER → DR |
| RT-C | 0 | 192.168.3.1 | DROTHER |
| RT-D | 1 | 192.168.1.4 | BDR → DROTHER |
