ポートセキュリティを設定する
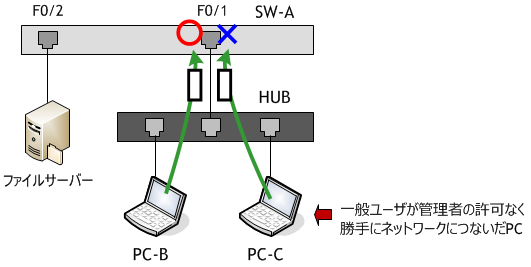
ポートセキュリティとは、スイッチポートが受信したフレームの送信元MACアドレスをチェックし、特定のデバイス (例えば、登録済みMACアドレスを持つデバイス) からのフレームのみ受信を許可する機能で、許可されているフレームは転送し、許可されていないフレームは破棄します。
SW-A の F0/1 に、PC-A からのフレームは受け取るが、PC-B からのフレームは破棄するというような動作となります。ポートセキュリティではこの判断を F0/1 で受信したフレームの送信元MACアドレスを見で行っているため、ファイルサーバーへのアクセスをレイヤ2レベルで制限できます。

ポートセキュリティは、スイッチ全体や VLAN 単位で設定するものではなく、ポート毎に設定します。
SW-A の F0/1 に、PC-A からのフレームは受け取るが、PC-B からのフレームは破棄するというような動作となります。ポートセキュリティではこの判断を F0/1 で受信したフレームの送信元MACアドレスを見で行っているため、ファイルサーバーへのアクセスをレイヤ2レベルで制限できます。

ポートセキュリティは、スイッチ全体や VLAN 単位で設定するものではなく、ポート毎に設定します。
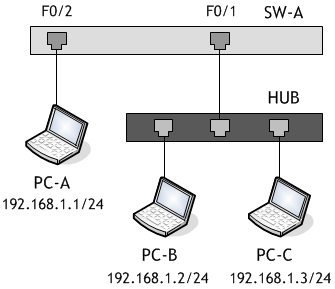
想定するネットワーク構成図
PC-A へのアクセスを制限するために、ポートセキュリティを SW-A に構成します。 HUB がない場合は、HUB の代わりにスイッチでも OK 。
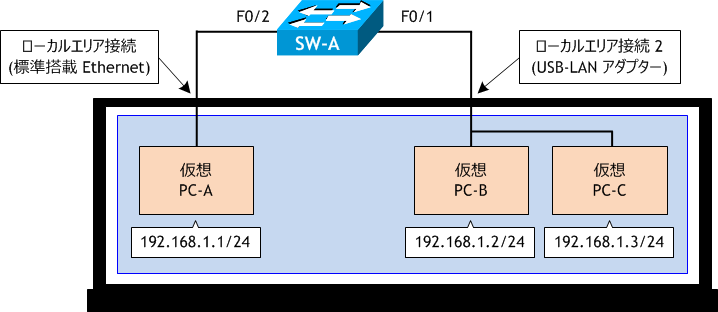
ラボ・シナリオで使用するネットワーク構成図
・物理 PC の VirtualBox 上に、PC-A、PC-B、PC-C の3つの仮想 PC を構成する。・PC-A は物理 PC に標準搭載している LAN ポートを使用するように VirtualBox を設定する。
・物理 PC に USB-LAN 変換ケーブルを1つ接続し、PC-B、PC-C がそれを使用するように VirtualBox を設定する。
・物理 PC の全ての LAN ポートのプロパティで、[VirtualBox Bridged Networking Driver] 以外の全てのチェックを外す。

- PC-A を、以下の情報を基に設定しなさい。
- PC-B を、以下の情報を基に設定しなさい。
- PC-C を、以下の情報を基に設定しなさい。
- SW-A に、ホスト名 SW-A を設定し、
SW-A がダイナミックに学習したMACアドレスを SW-A のMACアドレステーブルから消去しなさい。 - 1分程度待って SW-A のMACアドレステーブルを確認し、
ダイナミックに学習したMACアドレスが登録されていないことを確認しなさい。 - SW-A で、sh port-security interface f0/1 コマンドを実行しなさい。
- SW-A の F0/1 にポートセキュリティを設定しなさい。
- PC-B から PC-A へ ping を実行しなさい。
- SW-A で、再度 sh port-security interface f0/1 コマンドを実行しなさい。
- PC-C から PC-Aへ ping を実行しなさい。
- SW-A で、再度 sh port-security interface f0/1 コマンドを実行しなさい。
- PC-B のMACアドレスを調べなさい。
- PC-C のMACアドレスを調べなさい。
- SW-A で、sh int f0/1 コマンドを実行しなさい。
- SW-A の F0/1 で shut → no shut を実行し、結果を確認しなさい。
- SW-A で、sh port-security address コマンドを実行しなさい。
- PC-C から PC-Aへ ping を実行しなさい。
- SW-A で、再度 sh port-security address コマンドを実行しなさい。
- PC-B から PC-Aへ ping を実行しなさい。
- SW-A で、再度 sh port-security interface f0/1 コマンドを実行しなさい。
- SW-A で、sh port-security address コマンドを実行しなさい。
- SW-A で、sh port-security コマンドを実行しなさい。
- SW-A の F0/8 をトランクポートに設定し、ポートセキュリティを有効にしなさい。
- SW-A で、sh port-security コマンドを実行しなさい。
- SW-A の F0/1 と F0/8 で、ポートセキュリティを無効にしなさい。
- SW-A で、sh port-security コマンドを実行しなさい。
- PC-B から PC-Aへ ping を実行しなさい。
- PC-C から PC-Aへ ping を実行しなさい。
- SW-A で、sh int f0/1 | include FastEthernet コマンドを実行しなさい。
- SW-A の F0/1 で shut → no shut を実行し、sh int f0/1 コマンドを実行しなさい。
- PC-B から PC-Aへ ping を実行しなさい。
- PC-C から PC-Aへ ping を実行しなさい。
| IPアドレス | 192.168.1.1/24 |
|---|---|
| デフォルトゲートウェイ | なし |
< PC-A >
C:\> netsh interface ipv4 set address "イーサネット" static 192.168.1.1 255.255.255.0

C:\> ipconfig

Windows IP 構成

イーサネット アダプター イーサネット:

   接続固有の DNS サフィックス . . . . .:
   IPv4 アドレス . . . . . . . . . . . .: 192.168.1.1
   サブネット マスク . . . . . . . . . .: 255.255.255.0
   デフォルト ゲートウェイ . . . . . . .:

C:\>
| IPアドレス | 192.168.1.2/24 |
|---|---|
| デフォルトゲートウェイ | なし |
< PC-B >
C:\> netsh interface ipv4 set address "イーサネット" static 192.168.1.2 255.255.255.0

C:\> ipconfig

Windows IP 構成

イーサネット アダプター イーサネット:

   接続固有の DNS サフィックス . . . . .:
   IPv4 アドレス . . . . . . . . . . . .: 192.168.1.2
   サブネット マスク . . . . . . . . . .: 255.255.255.0
   デフォルト ゲートウェイ . . . . . . .:

C:\>
| IPアドレス | 192.168.1.3/24 |
|---|---|
| デフォルトゲートウェイ | なし |
< PC-C >
C:\> netsh interface ipv4 set address "イーサネット" static 192.168.1.3 255.255.255.0

C:\> ipconfig

Windows IP 構成

イーサネット アダプター イーサネット:

   接続固有の DNS サフィックス . . . . .:
   IPv4 アドレス . . . . . . . . . . . .: 192.168.1.3
   サブネット マスク . . . . . . . . . .: 255.255.255.0
   デフォルト ゲートウェイ . . . . . . .:

C:\>
< SW-A >
Switch# conf t
Enter configuration commands, one per line.  End with CNTL/Z.
Switch(config)# host SW-A
SW-A(config)# ^Z
SW-A# clear mac address-table dynamic
SW-A#
< SW-A >
SW-A# sh mac address-table
          Mac Address Table
-------------------------------------------

Vlan    Mac Address       Type        Ports
----    -----------       --------    -----
 All    0100.0ccc.cccc    STATIC      CPU
 All    0100.0ccc.cccd    STATIC      CPU
 All    0180.c200.0000    STATIC      CPU
 All    0180.c200.0001    STATIC      CPU
 All    0180.c200.0002    STATIC      CPU
 All    0180.c200.0003    STATIC      CPU
 All    0180.c200.0004    STATIC      CPU
 All    0180.c200.0005    STATIC      CPU
 All    0180.c200.0006    STATIC      CPU
 All    0180.c200.0007    STATIC      CPU
 All    0180.c200.0008    STATIC      CPU
 All    0180.c200.0009    STATIC      CPU
 All    0180.c200.000a    STATIC      CPU
 All    0180.c200.000b    STATIC      CPU
 All    0180.c200.000c    STATIC      CPU
 All    0180.c200.000d    STATIC      CPU
 All    0180.c200.000e    STATIC      CPU
 All    0180.c200.000f    STATIC      CPU
 All    0180.c200.0010    STATIC      CPU
 All    ffff.ffff.ffff    STATIC      CPU
Total Mac Addresses for this criterion: 20
SW-A#
Type の項に DYNAMIC のものがあれば、PCのMACアドレスを学習しているので、再度 clear mac address-table dynamic コマンドを実行し、MACアドレステーブルを確認してください。それでも消えない場合は、PCから余計なパケットが出ていますので、PCのネットワークの設定を確認してこれらが表示されないようにしてください。
   1    009f.310a.0000    DYNAMIC     Fa0/2
   1    009f.310b.0000    DYNAMIC     Fa0/1
   1    009f.310c.0000    DYNAMIC     Fa0/1
< SW-A >
SW-A# sh port-security int f0/1
Port Security              : Disabled
Port Status                : Secure-down
Violation Mode             : Shutdown
Aging Time                 : 0 mins
Aging Type                 : Absolute
SecureStatic Address Aging : Disabled
Maximum MAC Addresses      : 1
Total MAC Addresses        : 0
Configured MAC Addresses   : 0
Sticky MAC Addresses       : 0
Last Source Address:Vlan   : 0000.0000.0000:0
Security Violation Count   : 0

SW-A#
show port-security コマンドを使用すると、インターフェイスに定義されたポートセキュリティ設定を表示することができます。F0/1 のポートセキュリティは無効になっています。ポートセキュリティはスイッチのインターフェイス毎に有効/無効を構成します。
< SW-A >
SW-A# conf t
Enter configuration commands, one per line.  End with CNTL/Z.
SW-A(config)# int f0/1
SW-A(config-if)# switchport port-security   ← ポートセキュリティを有効にする
Command rejected: FastEthernet0/1 is a dynamic port.
SW-A(config-if)#
switchport port-security コマンドがリジェクトされました。
switchport port-security コマンドで、そのインターフェイスのポートセキュリティを有効にするのですが、ポートセキュリティを有効にできるのはスタティックに設定したアクセスまたはトランクポートのみで、ダイナミックポートには設定できません。(昔の IOS ではトランクポートにもポートセキュリティは設定できませんでした)
では、F0/1 の現在の設定を見てみましょう。
引き続き、F0/1 の現在の設定を確認しなさい。
switchport port-security コマンドで、そのインターフェイスのポートセキュリティを有効にするのですが、ポートセキュリティを有効にできるのはスタティックに設定したアクセスまたはトランクポートのみで、ダイナミックポートには設定できません。(昔の IOS ではトランクポートにもポートセキュリティは設定できませんでした)
では、F0/1 の現在の設定を見てみましょう。
引き続き、F0/1 の現在の設定を確認しなさい。
< SW-A >
SW-A(config-if)# switchport port-security
Command rejected: FastEthernet0/1 is a dynamic port.
SW-A(config-if)# do sh int f0/1 switchport
Name: Fa0/1
Switchport: Enabled
Administrative Mode: dynamic auto
Operational Mode: static access
Administrative Trunking Encapsulation: dot1q
Operational Trunking Encapsulation: native
Negotiation of Trunking: On
Access Mode VLAN: 1 (default)
Trunking Native Mode VLAN: 1 (default)
Administrative Native VLAN tagging: enabled
Voice VLAN: none
Administrative private-vlan host-association: none
Administrative private-vlan mapping: none
Administrative private-vlan trunk native VLAN: none
Administrative private-vlan trunk Native VLAN tagging: enabled
Administrative private-vlan trunk encapsulation: dot1q
Administrative private-vlan trunk normal VLANs: none
Administrative private-vlan trunk associations: none
Administrative private-vlan trunk mappings: none
Operational private-vlan: none
Trunking VLANs Enabled: ALL
Pruning VLANs Enabled: 2-1001
Capture Mode Disabled
Capture VLANs Allowed: ALL

Protected: false
Unknown unicast blocked: disabled
Unknown multicast blocked: disabled
Appliance trust: none
SW-A(config-if)#
現在このインターフェイスの Administrative Mode は dynamic auto になっていますので、ポートセキュリティを有効にする前に、ここを static access または trunk になるように変更しなければいけません。
引き続き、F0/1 をアクセスポートに設定し、再度 do sh int f0/1 switchport コマンドを実行しなさい。
引き続き、F0/1 をアクセスポートに設定し、再度 do sh int f0/1 switchport コマンドを実行しなさい。
< SW-A >
SW-A(config-if)# switchport mode access
SW-A(config-if)# do sh int f0/1 switchport | include Mode:
Administrative Mode: static access
Operational Mode: static access
SW-A(config-if)#
F0/1 の Administrative Mode が static access になりました。
引き続き、F0/1 のポートセキュリティを有効にし、do コマンドを使って設定を確認しなさい。
引き続き、F0/1 のポートセキュリティを有効にし、do コマンドを使って設定を確認しなさい。
< SW-A >
SW-A(config-if)# switchport port-security   ← ポートセキュリティを有効にする
SW-A(config-if)# do sh port-security int f0/1
Port Security              : Enabled
Port Status                : Secure-up
Violation Mode             : Shutdown
Aging Time                 : 0 mins
Aging Type                 : Absolute
SecureStatic Address Aging : Disabled
Maximum MAC Addresses      : 1
Total MAC Addresses        : 0
Configured MAC Addresses   : 0
Sticky MAC Addresses       : 0
Last Source Address:Vlan   : 0000.0000.0000:0
Security Violation Count   : 0

SW-A(config-if)# ^Z
SW-A#
F0/1 の Administrative Mode が static access になりました。
これで、SW-A の F0/1 のポートセキュリティをが有効になりました。
これで、SW-A の F0/1 のポートセキュリティをが有効になりました。
< PC-B >
C:\> ping 192.168.1.1

192.168.1.1 に ping を送信しています 32 バイトのデータ:
192.168.1.1 からの応答: バイト数 =32 時間 =794ms TTL=128
192.168.1.1 からの応答: バイト数 =32 時間 =2ms TTL=128
192.168.1.1 からの応答: バイト数 =32 時間 =2ms TTL=128
192.168.1.1 からの応答: バイト数 =32 時間 =2ms TTL=128

192.168.1.1 の ping 統計:
    パケット数: 送信 = 4、受信 = 4、損失 = 0 (0% の損失)、
ラウンド トリップの概算時間 (ミリ秒):
    最小 = 2ms、最大 = 794ms、平均 = 200ms

C:\>
ping は成功しました。
< SW-A >
SW-A# sh port-security int f0/1
Port Security              : Enabled
Port Status                : Secure-up
Violation Mode             : Shutdown
Aging Time                 : 0 mins
Aging Type                 : Absolute
SecureStatic Address Aging : Disabled
Maximum MAC Addresses      : 1
Total MAC Addresses        : 1
Configured MAC Addresses   : 0
Sticky MAC Addresses       : 0
Last Source Address:Vlan   : 009f.310b.0000:1
Security Violation Count   : 0

SW-A#
この結果は後の説明で必要になりますので、ここでは表示するだけです。
< PC-C >
C:\> ping 192.168.1.1

192.168.1.1 に ping を送信しています 32 バイトのデータ:
192.168.1.3 からの応答: 宛先ホストに到達できません。
192.168.1.3 からの応答: 宛先ホストに到達できません。
192.168.1.3 からの応答: 宛先ホストに到達できません。
192.168.1.3 からの応答: 宛先ホストに到達できません。

192.168.1.1 の ping 統計:
    パケット数: 送信 = 4、受信 = 4、損失 = 0 (0% の損失)、

C:\>
ping は失敗しました。
< SW-A >
SW-A# sh port-security int f0/1
Port Security              : Enabled
Port Status                : Secure-shutdown
Violation Mode             : Shutdown
Aging Time                 : 0 mins
Aging Type                 : Absolute
SecureStatic Address Aging : Disabled
Maximum MAC Addresses      : 1
Total MAC Addresses        : 0
Configured MAC Addresses   : 0
Sticky MAC Addresses       : 0
Last Source Address:Vlan   : 009f.310c.0000:1
Security Violation Count   : 1

SW-A#
Port Status が Secure-up から Secure-down になっています。
これはセキュリティ違反のフレームを検出したため、F0/1 が無効化したことを意味します。
これはセキュリティ違反のフレームを検出したため、F0/1 が無効化したことを意味します。
sh port-security int f0/1 の中を少し見てみましょう。
Last Source Address が次のように変わっていると思います。
つまり、送信元MACアドレス 009f.310b.0000 を持つフレームを受信し、これをセキュアMACアドレスとして登録し、その後、送信元MACアドレス 009f.310c.0000 を持つフレームを受信して、セキュリティ違反を起こし、そのフレームを破棄し、インターフェイスを無効化したということです。(細かい話になり、また重要ではないので詳細は控えますが、Last Source Address は最後に受信したフレームの送信元MACアドレスと同意ではありません。ただし、今回の設定パターンでは同じになります。)
では、送信元MACアドレス 009f.310b.0000や009f.310c.0000 はどの機器から来たフレームでしょうか?
Violation Mode : Shutdown
Violation Mode は、セキュリティ違反のフレームを検出した時の動作で、[protect|restrict|shutdown] の3つのうちから選ぶことができます。それぞれの違いは次の表を見てください。Violation Mode のデフォルトは shutdown で、shutdown はセキュリティ違反のフレームを破棄するだけでなく、インターフェイスの無効化まで行います。| protect | restrict | shutdown | |
|---|---|---|---|
| セキュリティ違反のフレームの破棄 | ○ | ○ | ○ |
| セキュリティ違反時の通知 | × | ○ | ○ |
| インターフェイスの無効化 | × | × | ○ |
Maximum MAC Addresses : 1
Maximum MAC Addresses は、このインターフェイスで許可する送信元MACアドレスの最大数です。許可するMACアドレスをセキュアMACアドレスといい、このアドレスはスタティックに登録することも、ダイナミックに学習することもできます。今回はスタティックには登録していませんので、ダイナミックに学習したセキュアMACアドレスを使っています。Maximum MAC Addresses が 1 なので、このインターフェイスで初めて受信したフレームの送信元MACアドレスをセキュアMACアドレスとして登録し、この送信元MACアドレスを持つフレームは受信を許可するが、それ以外のフレームを検出すると Violation Mode に従って動作します。つまりポートの無効化まで行います。Last Source Address:Vlan : 009f.310c.0000:1
[SW-A] のウィンドウをスクロールして、以前の sh port-security int f0/1 と比べてみてください。Last Source Address が次のように変わっていると思います。
| Last Source Address:Vlan : 0000.0000.0000:0 | ← フレームを全く受信していない状態 |
| Last Source Address:Vlan : 009f.310b.0000:1 | ← 送信元MACアドレスが 009f.310b.0000 のフレームを受信 |
| Last Source Address:Vlan : 009f.310c.0000:1 | ← 送信元MACアドレスが 009f.310c.0000 のフレームを受信 |
では、送信元MACアドレス 009f.310b.0000や009f.310c.0000 はどの機器から来たフレームでしょうか?
< PC-B >
C:\> ipconfig /all | findstr アドレス
   物理アドレス. . . . . . . . . . . . .: 00-9F-31-0B-00-00
   IPv4 アドレス . . . . . . . . . . . .: 192.168.1.2(優先)

C:\>
009f.310b.0000 が PC-B のMACアドレスでした。
< PC-C >
C:\> ipconfig /all | findstr アドレス
   物理アドレス. . . . . . . . . . . . .: 00-9F-31-0C-00-00
   IPv4 アドレス . . . . . . . . . . . .: 192.168.1.2(優先)

C:\>
009f.310c.0000 が PC-C のMACアドレスでした。
つまり、PC-C 発のフレームがセキュリティ違反のフレームだったわけです。
これで、SW-A の F0/1 は、最初に PC-B 発のフレームを受信し、PC-B のMACアドレスをセキュアMACアドレスとして登録し、その後に PC-C 発のフレームを受信し、これがセキュリティ違反のフレームとなり破棄され、F0/1 が無効になったということがわかりました。
つまり、PC-C 発のフレームがセキュリティ違反のフレームだったわけです。
これで、SW-A の F0/1 は、最初に PC-B 発のフレームを受信し、PC-B のMACアドレスをセキュアMACアドレスとして登録し、その後に PC-C 発のフレームを受信し、これがセキュリティ違反のフレームとなり破棄され、F0/1 が無効になったということがわかりました。
< SW-A >
SW-A# sh int f0/1
FastEthernet0/1 is down, line protocol is down (err-disabled)
  Hardware is Fast Ethernet, address is 0024.900a.0001 (bia 0024.900a.0001)
  MTU 1500 bytes, BW 10000 Kbit/sec, DLY 1000 usec,
     reliability 255/255, txload 1/255, rxload 1/255
  Encapsulation ARPA, loopback not set
      ・
      ・
      ・
ポートセキュリティを設定したポートでセキュリティ違反によりインターフェイスが無効化された場合、インターフェイスの状態は err-disable になります。
セキュリティ違反により無効化されたインターフェイスを有効に戻すには、そのインターフェイスで shut コマンドを実行後、no shut コマンドを実行します。
< SW-A >
SW-A# conf t
Enter configuration commands, one per line.  End with CNTL/Z.
SW-A(config)# int f0/1
SW-A(config-if)# shut
SW-A(config-if)# no shut
SW-A(config-if)# ^Z
SW-A# sh port-security int f0/1
Port Security              : Enabled
Port Status                : Secure-up
Violation Mode             : Shutdown
Aging Time                 : 0 mins
Aging Type                 : Absolute
SecureStatic Address Aging : Disabled
Maximum MAC Addresses      : 1
Total MAC Addresses        : 0
Configured MAC Addresses   : 0
Sticky MAC Addresses       : 0
Last Source Address:Vlan   : 009f.310c.0000:1
Security Violation Count   : 0

SW-A#
セキュリティ違反により無効化されていた F0/1 が有効化されました。
< SW-A >
SW-A# sh port-security address
               Secure Mac Address Table
-----------------------------------------------------------------------------
Vlan    Mac Address       Type                          Ports   Remaining Age
                                                                   (mins)
----    -----------       ----                          -----   -------------
-----------------------------------------------------------------------------
Total Addresses in System (excluding one mac per port)     : 0
Max Addresses limit in System (excluding one mac per port) : 8192
SW-A#
後からもう一度このコマンドを実行し見比べますので、現時点では表示するだけで結構です。
< PC-C >
C:\> ping 192.168.1.1

192.168.1.1 に ping を送信しています 32 バイトのデータ:
192.168.1.1 からの応答: バイト数 =32 時間 =980ms TTL=128
192.168.1.1 からの応答: バイト数 =32 時間 =1ms TTL=128
192.168.1.1 からの応答: バイト数 =32 時間 =1ms TTL=128
192.168.1.1 からの応答: バイト数 =32 時間 =2ms TTL=128

192.168.1.1 の ping 統計:
    パケット数: 送信 = 4、受信 = 4、損失 = 0 (0% の損失)、
ラウンド トリップの概算時間 (ミリ秒):
    最小 = 1ms、最大 = 980ms、平均 = 246ms

C:\>
ping は成功しました。
< SW-A >
SW-A# sh port-security address
               Secure Mac Address Table
-----------------------------------------------------------------------------
Vlan    Mac Address       Type                          Ports   Remaining Age
                                                                   (mins)
----    -----------       ----                          -----   -------------
   1    009f.310c.0000    SecureDynamic                 Fa0/1        -
-----------------------------------------------------------------------------
Total Addresses in System (excluding one mac per port)     : 0
Max Addresses limit in System (excluding one mac per port) : 8192
SW-A#
sh port-security address コマンドは、現在登録されているセキュアMACアドレスを表示させることができます。
最初に sh port-security address コマンドを実行した時にはエントリはありませんでしたので、PC-C から ping を実行した時に、PC-C のMACアドレスがセキュアMACアドレスとして登録されたことがわかります。
最初に sh port-security address コマンドを実行した時にはエントリはありませんでしたので、PC-C から ping を実行した時に、PC-C のMACアドレスがセキュアMACアドレスとして登録されたことがわかります。
< PC-B >
C:\> ping 192.168.1.1

Pinging 192.168.1.1 with 32 bytes of data:

192.168.1.1 に ping を送信しています 32 バイトのデータ:
192.168.1.2 からの応答: 宛先ホストに到達できません。
192.168.1.2 からの応答: 宛先ホストに到達できません。
192.168.1.2 からの応答: 宛先ホストに到達できません。
192.168.1.2 からの応答: 宛先ホストに到達できません。

192.168.1.1 の ping 統計:
    パケット数: 送信 = 4、受信 = 4、損失 = 0 (0% の損失)、

C:\>
< SW-A >
SW-A# sh port-security int f0/1
Port Security              : Enabled
Port Status                : Secure-shutdown
Violation Mode             : Shutdown
Aging Time                 : 0 mins
Aging Type                 : Absolute
SecureStatic Address Aging : Disabled
Maximum MAC Addresses      : 1
Total MAC Addresses        : 0
Configured MAC Addresses   : 0
Sticky MAC Addresses       : 0
Last Source Address:Vlan   : 009f.310b.0000:1
Security Violation Count   : 1

SW-A#
< SW-A >
SW-A# sh port-security address
               Secure Mac Address Table
-----------------------------------------------------------------------------
Vlan    Mac Address       Type                          Ports   Remaining Age
                                                                   (mins)
----    -----------       ----                          -----   -------------
-----------------------------------------------------------------------------
Total Addresses in System (excluding one mac per port)     : 0
Max Addresses limit in System (excluding one mac per port) : 8192
SW-A#
セキュリティ違反によりインターフェイスが無効化された場合、そのポートに関連づけて登録されていたセキュアMACアドレスはセキュアMACアドレステーブルから削除されます。
< SW-A >
SW-A# sh port-security
Secure Port  MaxSecureAddr  CurrentAddr  SecurityViolation  Security Action
                (Count)       (Count)          (Count)
---------------------------------------------------------------------------
      Fa0/1              1            0                  1         Shutdown
---------------------------------------------------------------------------
Total Addresses in System (excluding one mac per port)     : 0
Max Addresses limit in System (excluding one mac per port) : 8192
SW-A#
sh port-security コマンドは、ポートセキュリティを有効にしているインターフェイスを表示します。
< SW-A >
Switch# conf t
Enter configuration commands, one per line.  End with CNTL/Z.
SW-A(config)# int f0/8
SW-A(config-if)# switchport mode trunk
SW-A(config-if)# switchport port-security
SW-A(config-if)#
< SW-A >
SW-A(config-if)# do sh port-security
Secure Port  MaxSecureAddr  CurrentAddr  SecurityViolation  Security Action
                (Count)       (Count)          (Count)
---------------------------------------------------------------------------
      Fa0/1              1            0                  1         Shutdown
      Fa0/8              1            0                  0         Shutdown
---------------------------------------------------------------------------
Total Addresses in System (excluding one mac per port)     : 0
Max Addresses limit in System (excluding one mac per port) : 8192
SW-A(config-if)#
F0/1 と F0/8 の2つのインターフェイスでポートセキュリティを有効にしています。
< SW-A >
SW-A(config-if)# int f0/1
SW-A(config-if)# no switchport port-security
SW-A(config-if)# int f0/8
SW-A(config-if)# no switchport port-security
SW-A(config-if)# ^Z
SW-A#
< SW-A >
SW-A# sh port-security
Secure Port  MaxSecureAddr  CurrentAddr  SecurityViolation  Security Action
                (Count)       (Count)          (Count)
---------------------------------------------------------------------------
---------------------------------------------------------------------------
Total Addresses in System (excluding one mac per port)     : 0
Max Addresses limit in System (excluding one mac per port) : 8192
SW-A#
SW-A で設定されているポートセキュリティはありません。
< PC-B >
C:\> ping 192.168.1.1

Pinging 192.168.1.1 with 32 bytes of data:

192.168.1.1 に ping を送信しています 32 バイトのデータ:
192.168.1.2 からの応答: 宛先ホストに到達できません。
192.168.1.2 からの応答: 宛先ホストに到達できません。
192.168.1.2 からの応答: 宛先ホストに到達できません。
192.168.1.2 からの応答: 宛先ホストに到達できません。

192.168.1.1 の ping 統計:
    パケット数: 送信 = 4、受信 = 4、損失 = 0 (0% の損失)、

C:\>
< PC-C >
C:\> ping 192.168.1.1

Pinging 192.168.1.1 with 32 bytes of data:

192.168.1.1 に ping を送信しています 32 バイトのデータ:
192.168.1.3 からの応答: 宛先ホストに到達できません。
192.168.1.3 からの応答: 宛先ホストに到達できません。
192.168.1.3 からの応答: 宛先ホストに到達できません。
192.168.1.3 からの応答: 宛先ホストに到達できません。

192.168.1.1 の ping 統計:
    パケット数: 送信 = 4、受信 = 4、損失 = 0 (0% の損失)、

C:\>
PC-B、PC-C ともに、PC-A への ping が失敗します。
< SW-A >
SW-A# sh int f0/1 | include FastEthernet
FastEthernet0/1 is down, line protocol is down (err-disabled)
SW-A#
no switchport port-security コマンドでポートセキュリティを無効にしても、セキュリティ違反により無効化されたインターフェイスの状態は err-disable のままで、インターフェイスは down しています。
< SW-A >
SW-A# conf t
Enter configuration commands, one per line.  End with CNTL/Z.
SW-A(config)# int f0/1
SW-A(config-if)# shut
SW-A(config-if)# no shut
SW-A(config-if)# ^Z
SW-A# sh int f0/1 | include FastEthernet
FastEthernet0/1 is up, line protocol is up (connected)
SW-A#
セキュリティ違反により無効化されていた F0/1 が有効化されました。
< PC-B >
C:\> ping 192.168.1.1

192.168.1.1 に ping を送信しています 32 バイトのデータ:
192.168.1.1 からの応答: バイト数 =32 時間 =11ms TTL=128
192.168.1.1 からの応答: バイト数 =32 時間 =2ms TTL=128
192.168.1.1 からの応答: バイト数 =32 時間 =2ms TTL=128
192.168.1.1 からの応答: バイト数 =32 時間 =1ms TTL=128

192.168.1.1 の ping 統計:
    パケット数: 送信 = 4、受信 = 4、損失 = 0 (0% の損失)、
ラウンド トリップの概算時間 (ミリ秒):
    最小 = 1ms、最大 = 11ms、平均 = 4ms

C:\>
< PC-C >
C:\> ping 192.168.1.1

192.168.1.1 に ping を送信しています 32 バイトのデータ:
192.168.1.1 からの応答: バイト数 =32 時間 =12ms TTL=128
192.168.1.1 からの応答: バイト数 =32 時間 =1ms TTL=128
192.168.1.1 からの応答: バイト数 =32 時間 =2ms TTL=128
192.168.1.1 からの応答: バイト数 =32 時間 =2ms TTL=128

192.168.1.1 の ping 統計:
    パケット数: 送信 = 4、受信 = 4、損失 = 0 (0% の損失)、
ラウンド トリップの概算時間 (ミリ秒):
    最小 = 1ms、最大 = 12ms、平均 = 4ms

C:\>
PC-B、PC-C ともに、PC-A への ping は成功しました。
※ 次の「シナリオ」に続きます。